- How to Create a Release
- How to Edit or Delete a Release
- How to see a Public Preview of a Release from a fan's point of view
- FAQs
EngineEars Direct: this Sell Direct feature is currently in PUBLIC BETA. This means that the feature may occasionally contain bugs or errors, and be subject to change as we seek to improve the feature experience for customers overall.
Create a Release
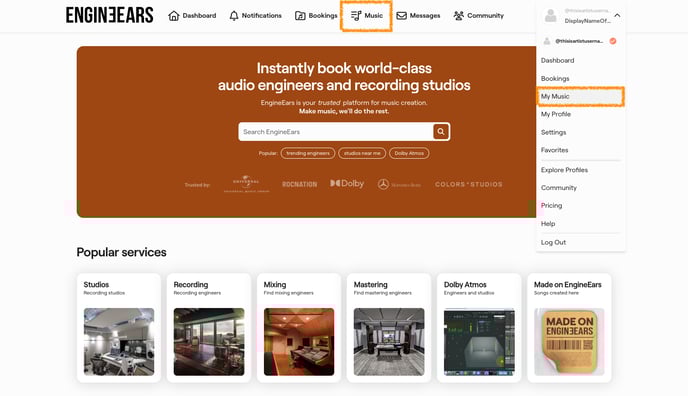
1. Signup to create a new Artist account on EngineEars.com or login to your existing account.
2. In the navigation menu or the profile dropdown menu, click to go to the My Music page.
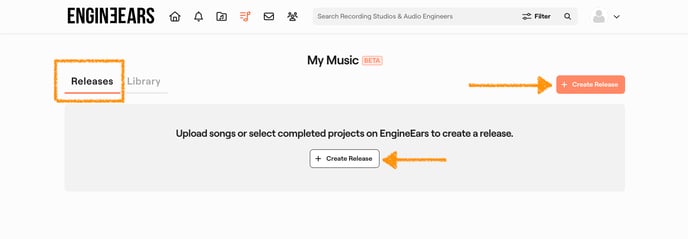
3. Once on the My Music page, make sure you're in the Releases tab. To create a new release click the "Create Release" button.
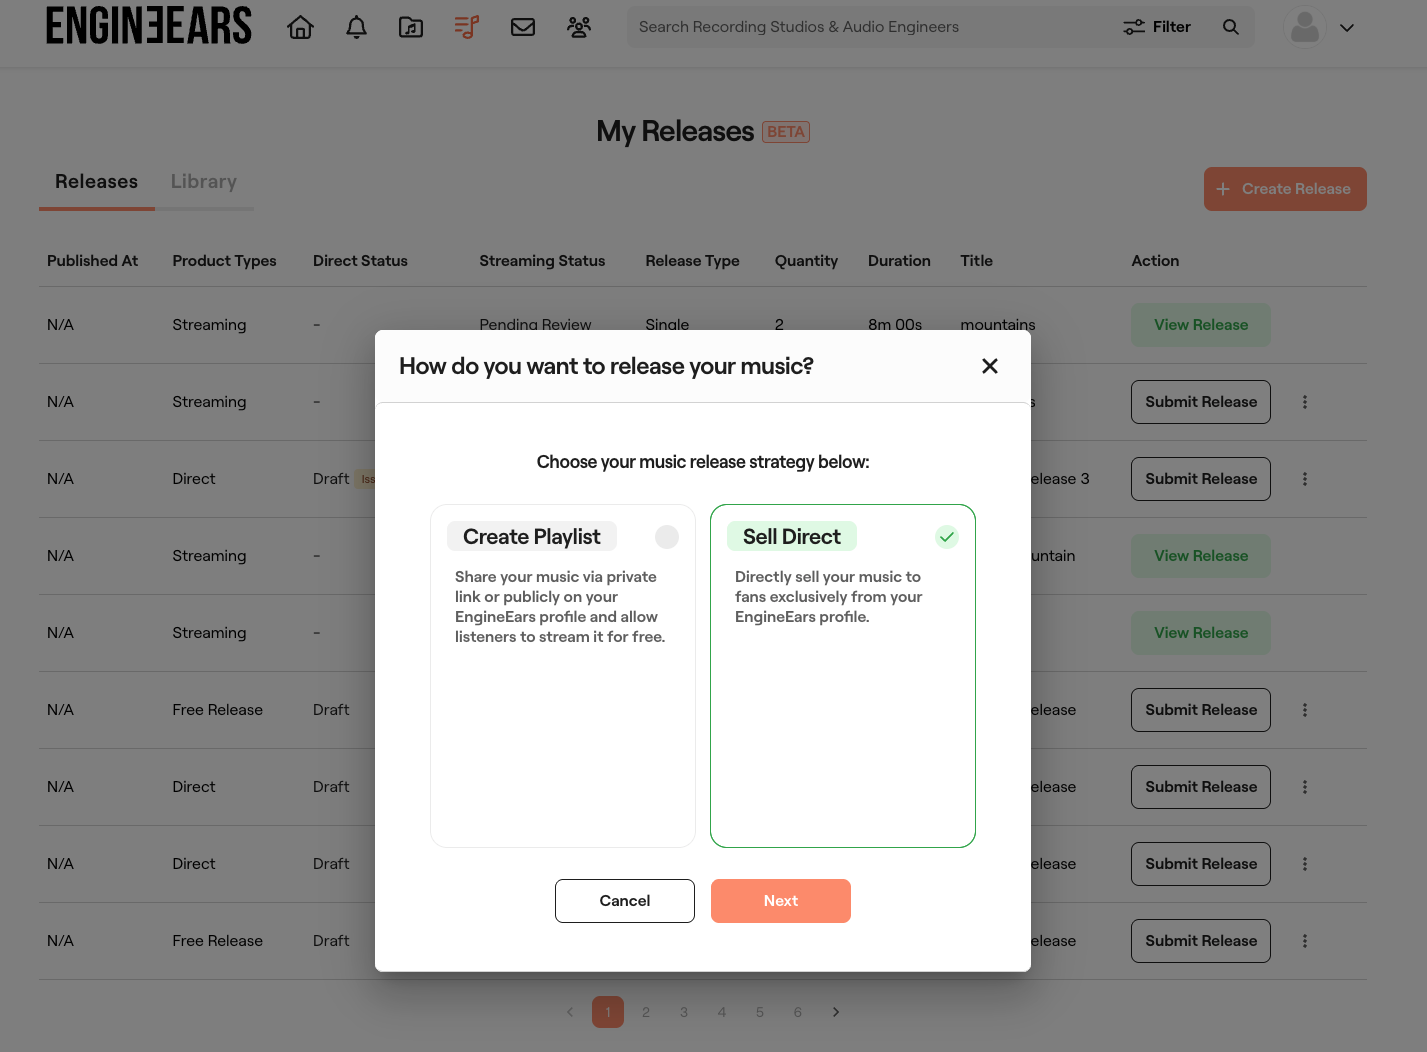
4. Choose how you want to release your music, then click "Next".
- Create Playlist (formerly "Release for free"): choose this option if you want to publish your song(s) onto your public Artist Profile for fans/visitors to listen for free.
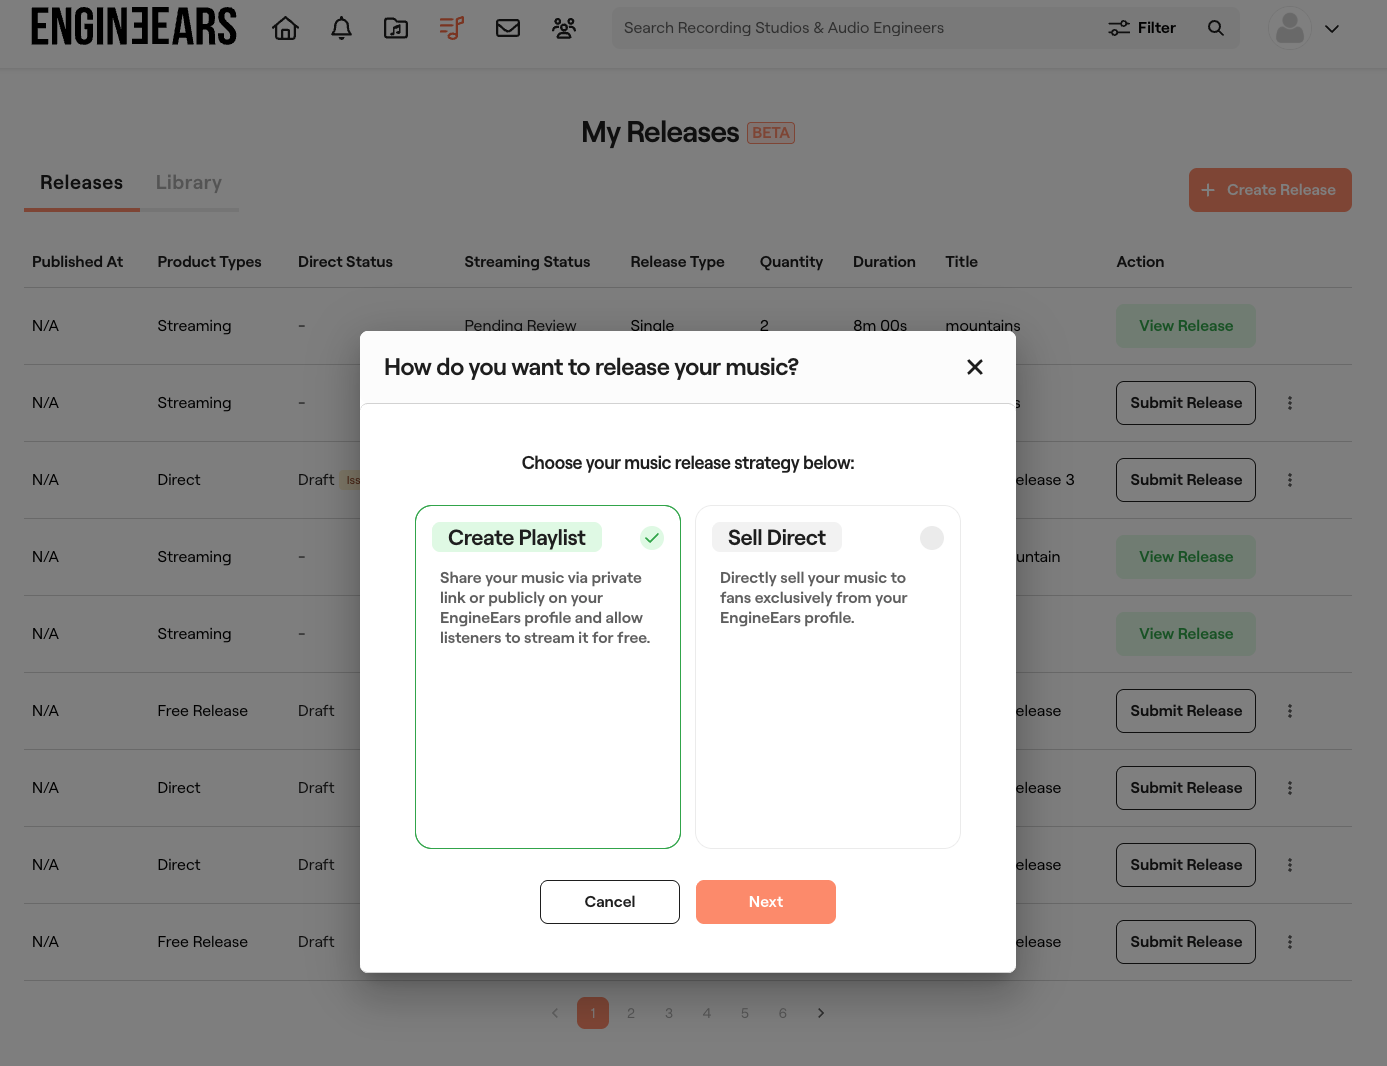
- Sell Direct: choose this option if you want to publish your song(s) onto your public Artist Profile for fans/visitors to purchase, listen, and/or download for a defined price.
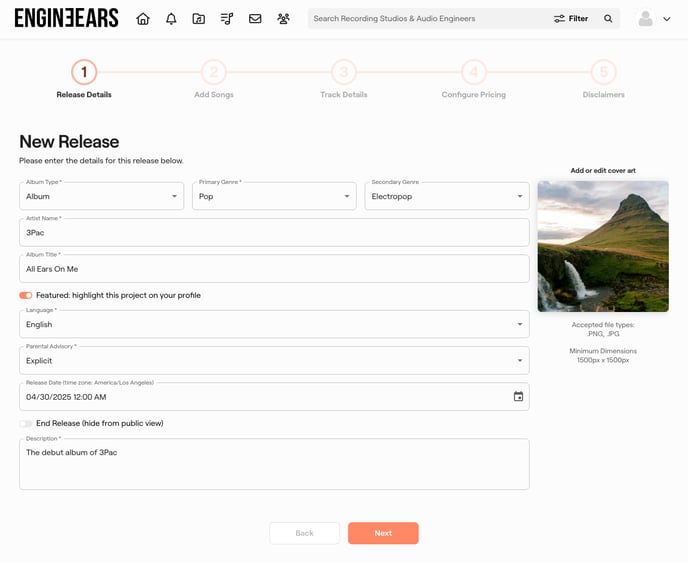
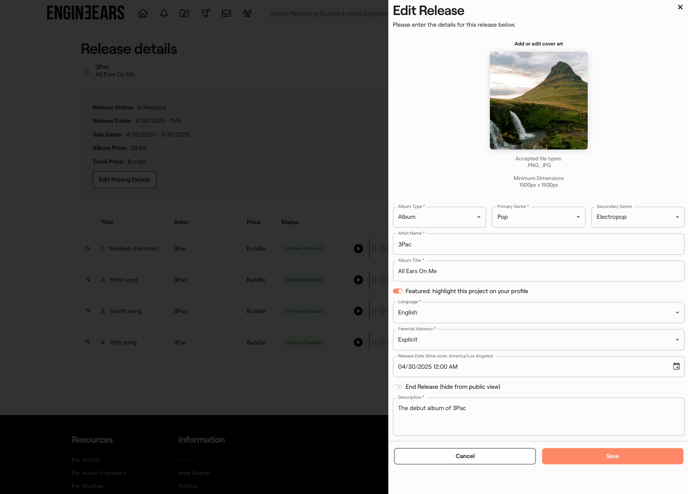
5. Release Details: enter the details for your release. Once you're done, click "Next".
- Album Type: select Single, EP, or Album
- Primary Genre: select the primary genre of your release
- Secondary Genre (optional): select a sub genre for your release
- Artist Name: your official artist name, stage name, or performing/touring name
- Album Title: name of your single, EP, or album being released
- Featured: turn this ON if you'd like this release to be prominently displayed on your public Artist Profile. Keep this OFF if you'd prefer this release to be shown in your Catalog section of your public Artist Profile, or you have another release to be displayed prominently instead.
- Language: the primary language of the title of your album/single release.
- Parental Advisory: select whether any songs in your release contain explicit language ("explicit"), explicit language but censored/bleeped/modified for the radio ("clean"), or "non-explicit (does not contain censored/bleeped content nor explicit content). If this release is an instrumental or has no lyrics, select "Non-Explicit".
- Release Date: Choose the exact date/time (in your local timezone) for when this release is to be publicly shown and available on your Artist Profile. Select the current date/time if you prefer the release to be published Live immediately once submitted. Select a date/time in the future if you prefer the release to be Scheduled to be published live at a later date/time after submission.
- End Release: Turn this ON if you want this release to be automatically hidden from your public Artist Profile. Keep this OFF if you want your release to be shown on your public Artist Profile indefinitely.
- Description: Add a description to accompany your release so that fans/visitors can learn about your artistic motivations, inspirations, and what this music release is about.
- Cover Art: Upload a high-resolution quality image or photo of the cover art for your single/EP/Album release. Only .png and .jpg file formats are accepted. Uploaded images must be at least 1500 pixels X 1500 pixels in dimension.
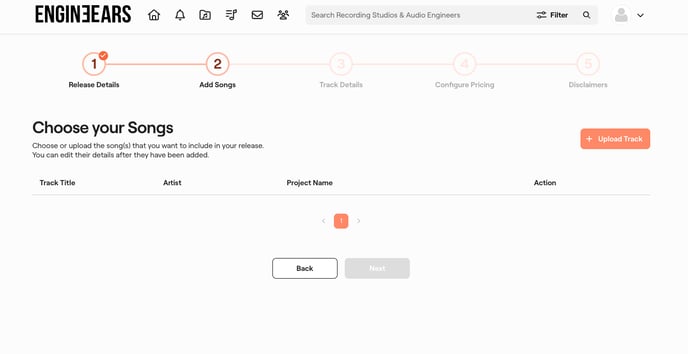
6. Add Songs: upload one or more new song files or choose existing song files to include in your release. You can create a release that has a combination of uploaded tracks and selected tracks.
- Upload Track: Click the "Upload Track" button to upload a file for each song you want to include in your release submission.
Only .WAV file formats are accepted for song file uploads.
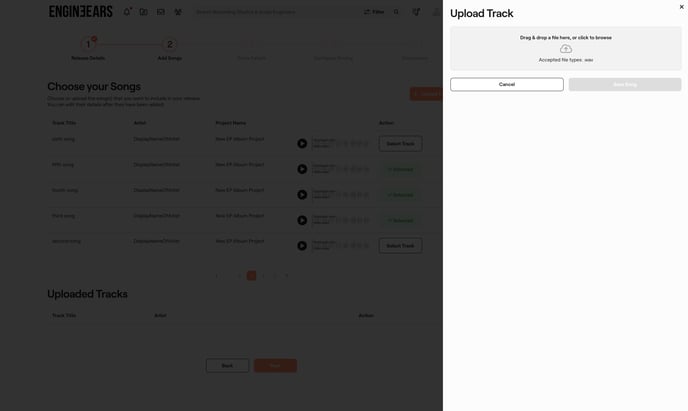
Once the song file is uploaded, click the "Save Song" button.
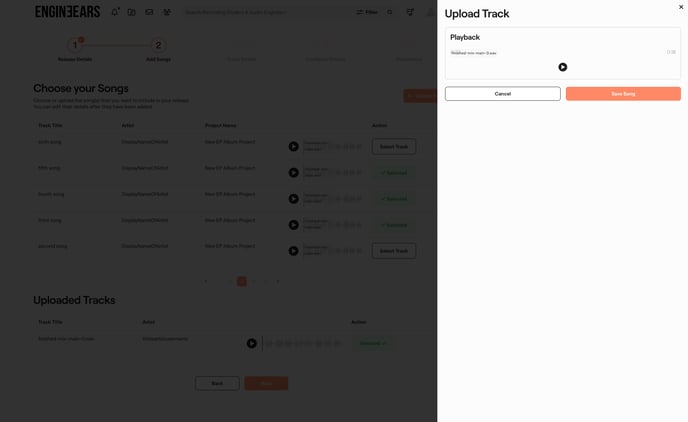
Enter details for the song you uploaded, then click "Save Song".

- Select Track: Browse through your completed projects (if any) to select one or more songs from any projects you have completed on the EngineEars platform. The final asset files and song details from the completed project will be submitted for the release.
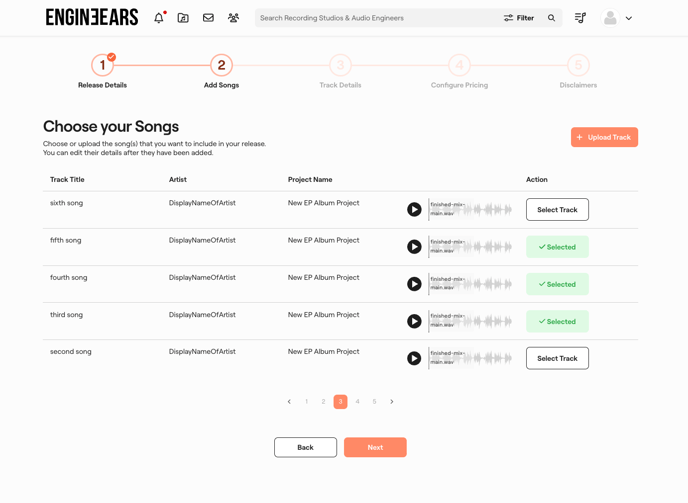
Once you're done selecting/uploading tracks to your release, click "Next" to proceed.

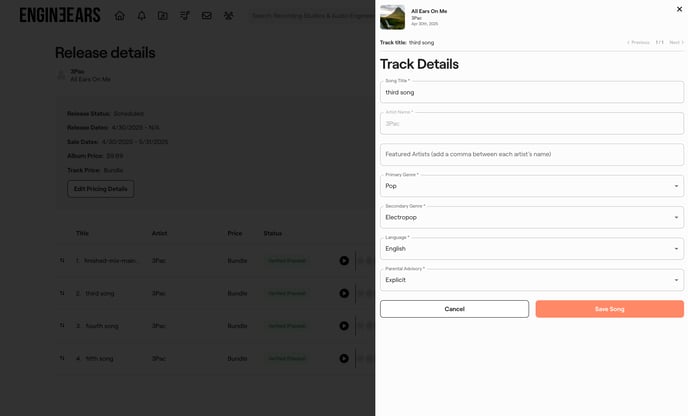
7. Track Details: You now have the chance to specify the song details for each track uploaded/selected to be included in your release. If you need to reorder the sequencing of your tracks, click the arrows on each row and drag a track to a different spot in the list to reorder them.
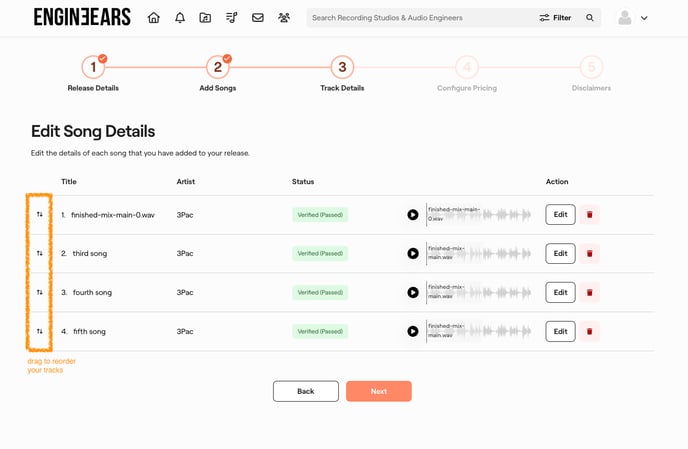
Click the Edit button on each row to view and edit the track's details. You have the option to either enter or update the details for each song included in the release. Click "Save Song" after editing the details for a song.
- Song Title: add/modify the name of your song
- Artist Name: your official artist name, stage name, or performing/touring name specified in the Release Details (step 1). To change this, click the "Back" button to edit your Release Details.
- Featured Artists (optional): enter the names of any featured artists on this song separated by a comma if more than one.
- Primary Genre: select the primary genre of this song (if different than the release)
- Secondary Genre (optional): select a sub genre for this song (if different than the release)
- Language: the primary language of the lyrics in this song (if different than the release). If this song is an instrumental and contains no vocal lyrics, choose "ZXX (No Language)".
- Parental Advisory: select whether this song contains explicit language ("explicit"), explicit language but censored/bleeped/modified for the radio ("clean"), or "non-explicit (does not contain censored/bleeped content nor explicit content). If this release is an instrumental or has no lyrics, select "Non-Explicit".
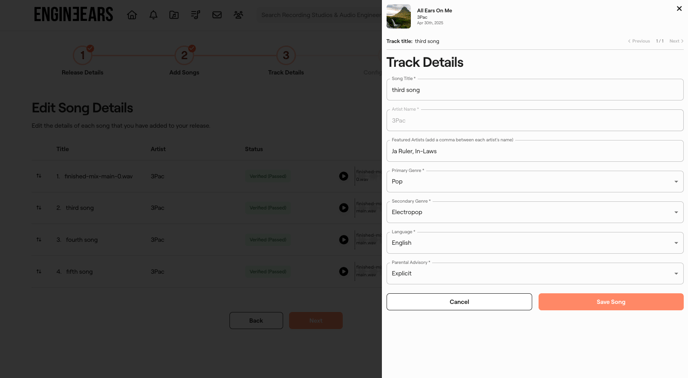
Once you're done, click "Next" to proceed to the next step.
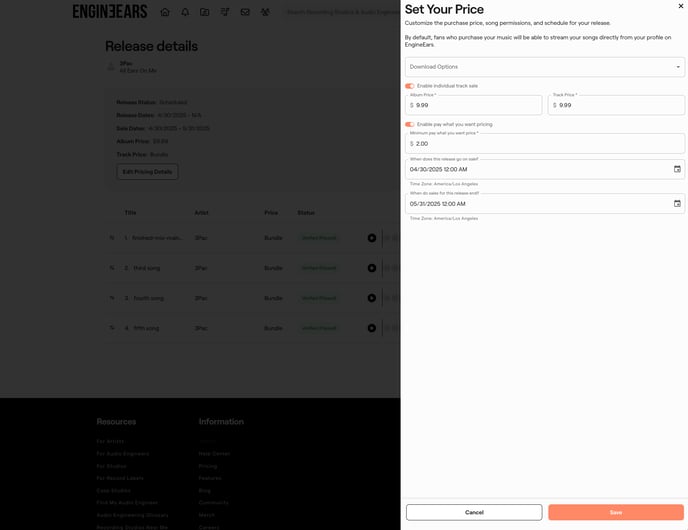
8. Configure Pricing: Customize the price, song permissions, and sales schedule for your release.
Note: If you chose "Create Playlist" this step is skipped. This step is required when "Sell Direct" is chosen.
- Download options (optional): Choose whether or not fans who purchase are able to download MP3 and/or WAV file versions of your songs. By default, fans who purchase will be able to stream the purchased songs, but not download.
- Album price: Set the price you want to sell your entire EP/album release for.
- Track price: Set the price you want to sell each individual track within this release.
- Enable "pay what you want" pricing (optional): Provide fans/visitors the option to flexibly pay what they want when purchasing the entire release. Keep this OFF if you want everyone to pay the same predefined album and track prices determined above. Turn this ON if you want to let fans specify their own desired price for purchasing your release. If enabled (ON), you will need to specify a minimum price, this means fans must pay at least this amount or more when purchasing this release.
- When does this release go on sale: this is the start date/time (in your timezone) for when this release is available for sale on your Artist Profile page.
- When do sales for this release end (optional): this is the end date/time (in your timezone) for when this release stops selling on your Artist Profile page, and is no longer available for purchase.
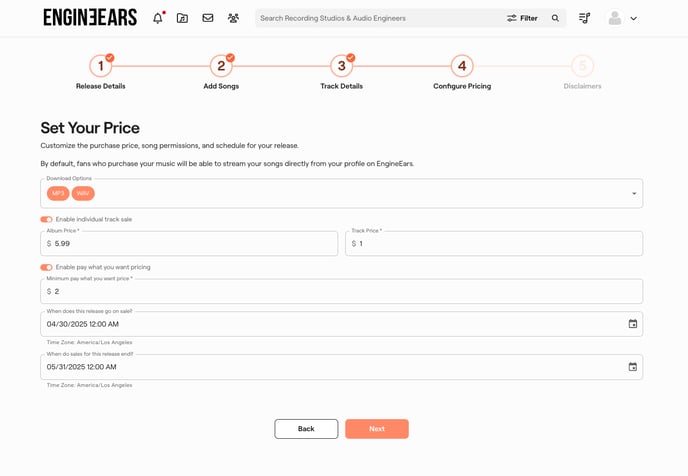
Once you're done, click "Next" to proceed to the next step.
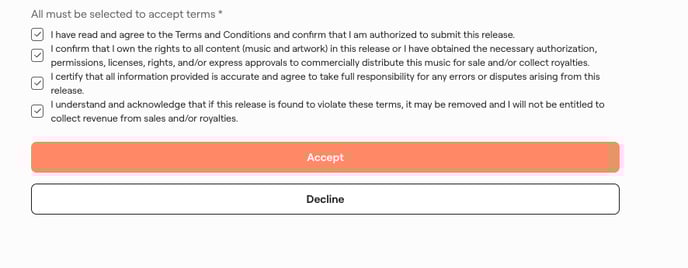
9. Disclaimers: Carefully read, review and agree to the terms in order to submit your release. If you decline, your release is saved as a 'draft' but is not submitted for release to your Artist Profile. You must accept all the terms in order to proceed with release submission.
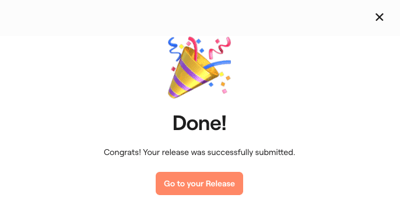
10. Once submitted, you will receive a confirmation that your release has been uploaded, verified, and successfully submitted.
Notes:
- If the songs in your release have been successfully uploaded, submitted and passed verification, then your release will go live on your Artist Profile page based on your defined Release start date.
- The status of your release will appear as Live if it is published live on your public Artist Profile for visitors/fans to see and buy. The status of your release will appear as Scheduled if it is set to be published on your public Artist Profile for a date/time in the future that visitors/fans will be able to see and buy.
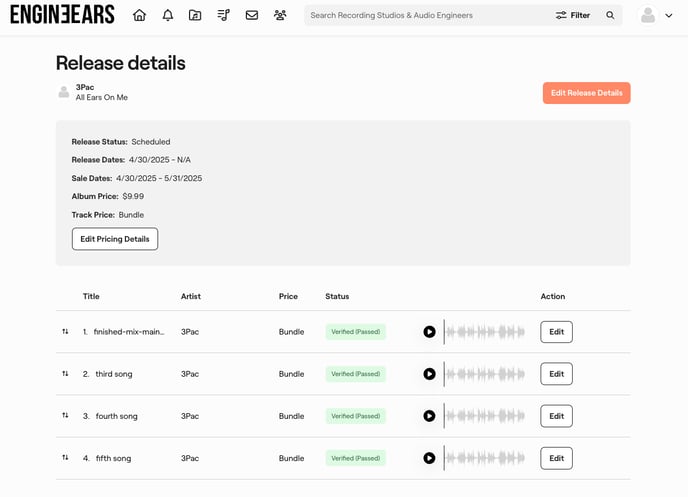
Click the "Go to your Release" button. You will be able to monitor the status of your release as well as view/edit details for your submitted release on this Release Details page.
Edit or Delete a Release
1. Login to your existing Artist account on EngineEars.com.
2. In the navigation menu or the profile dropdown menu, click to go to the My Music page.
3. Once on the My Music page, make sure you're in the Releases tab. Then locate the specific release you want to edit or delete.
- To delete a release, click the trash icon. You can only delete draft or unsubmitted releases.
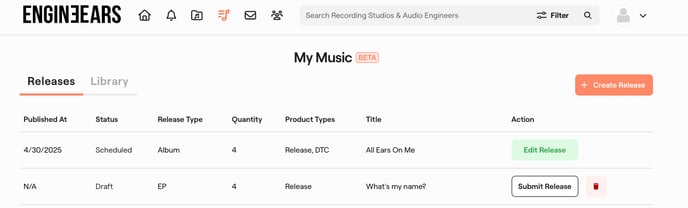
4. To edit a release, locate the specific release you want to edit and click the "Edit Release" button. This will open the Release Details page where you can make changes.
You will be able to view/edit details for your submitted release on this Release Details page.
- Edit Release Details: allows you to view/edit the overall details about your release
- Edit Pricing Details: allows you to view/edit the pricing details and sales schedule for your release (if "Sell Direct")
- Edit (on each song row): allows you to view/edit details for each song within your release
6. Once you are done making changes, click "Save" to apply the changes to your release.
Public Preview of a Release
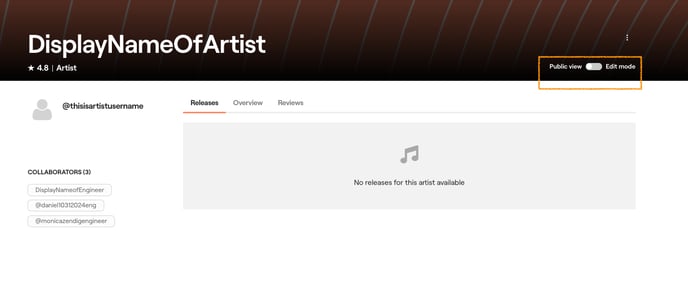
1. Click the profile dropdown menu, then click "My Profile" to visit your Artist Profile.
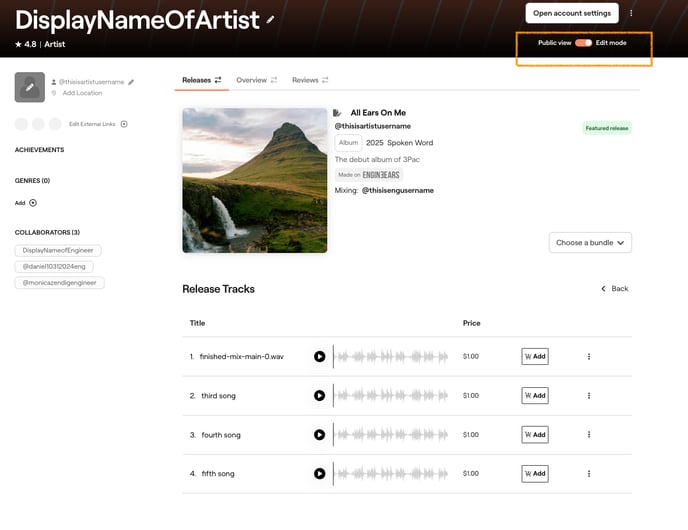
2. Upon arriving on your Artist Profile, you will be in "Edit Mode". With "Edit Mode" toggled ON, you will be able to see your successfully submitted releases in the "Releases" tab.
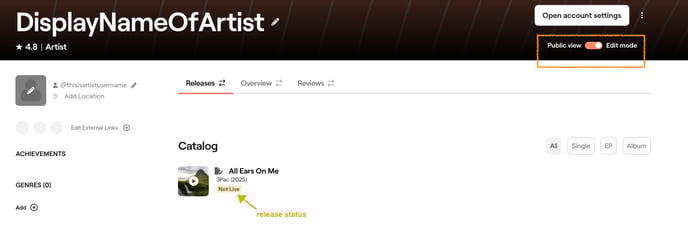
- If the release has a future start date/time, it will have a release status labeled with the scheduled start Date.
- If the release has a past start date/time, it will have a release status labeled as Live Now.
- If a release has a past end date/time, it will have a release status labeled as Not Live.
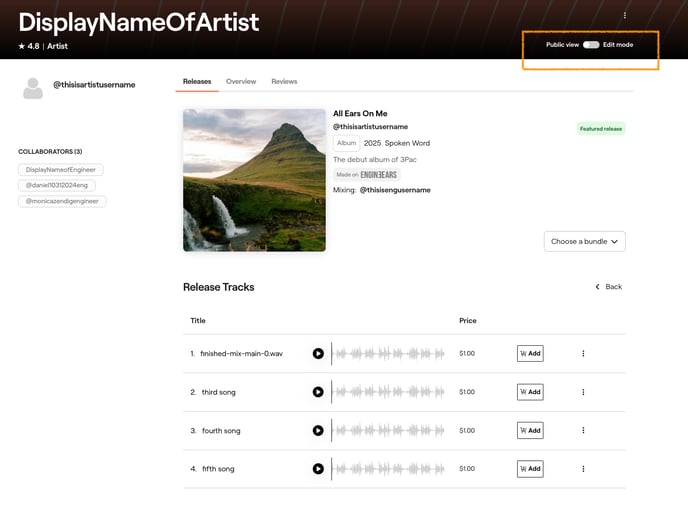
3. To preview how releases appear on your public Artist Profile to visiting fans, click "Edit Mode" toggle to OFF so that you switch to "Public View" ON. This allows you to view your Artist Profile from the perspective of fans and listeners.
- Scheduled future releases will not appear to fans until their start date/time
- Live Now releases will appear to fans until their end date/time (if specified), otherwise they will appear indefinitely.
- Not Live releases will not appear to fans since their specified end date/time has passed, or the release has been manually ended/hidden from view.
4. You can also click into a particular release to preview its details, such as the pricing set for the album, individual tracks, ordering, and streaming playback. You can toggle between "Edit Mode" ON/OFF and "Public View" ON/OFF to compare how fans experience this release on your profile.
-png-1.png?width=688&height=338&name=Screenshot%202025-04-07%20at%203-18-38%E2%80%AFPM%20(2)-png-1.png)
FAQs
- How can I learn more about Direct?
- You can learn more about the capabilities and benefits of EngineEars Direct here.
- Can I create multiple releases to be published on my Artist Profile page?
- Yes. You can publish multiple releases (both Create Playlist, and Sell Direct) at the same time to appear on your profile page where fans can discover, listen to, and purchase your digital music.
- One or more song(s) on my release has the status "Issue Found" or "Verified (Failed)". What does it mean, and what can I do?
- If your songs encounter an issue, there was a problem with the format of the file during the upload or release submission process, or it failed copyright verification checks. If you are presented with the "issue found" or "verified (failed") status on a song, click into the song to inspect the reason for the problem. Either try to upload a different song file to resolve the issue or removing the problematic song(s) from the release. You will need to resubmit the release to ensure it is successfully submitted and accepted.
- How do I add a song to my release after I submitted it successfully?
- Unfortunately, once a release has been submitted, verified, and accepted, you cannot add songs to the release. However, you are able to remove songs. You will need to create a new release with the inclusion of the song you wanted to add, and remove the existing release from your profile.
- How long can I feature my releases on my Artist Profile page?
- As long as you desire. Adding an end date/time to your release is not mandatory. If you don't have an end date/time, your release will appear on your profile indefinitely until it's manually ended (hidden from public view).
- Can fans purchase my music using another currency besides USD?
- Not currently. Music purchases are only supported in US Dollars (USD).
- How much do I earn when fans buy my music from my profile page?
- Paid subscribers to the Artist Platinum Plan keep 100% of earnings with 0% commission fees on sales. Free Artist Essentials Plan members keep 90% of earnings with 10% commission fees on sales. Learn more.
- Does EngineEars Direct have a mobile app?
- We don't currently offer a mobile app. However, you can add EngineEars to your mobile device 📲 as a home screen shortcut. Need to manage your release, reply to fans, withdraw earnings, or monitor performance while on the go? We got you covered.
- How can I promote my release to attract new audiences in addition to my fans/followers?
- You can create a social ad campaign (powered by Symphony.OS) to promote your new release to your fans, followers and new audiences across Facebook and Instagram. The ads are optimized to drive clicks and boost traffic to visit your Artist Profile page where your release can be viewed, purchased, or listened to.
- How do I set up Stripe for my account to get paid my earnings from my release?
- If you have sales transactions by fans who purchased your release, your earnings (net of commission fees, if any) will be deposited as a balance in your account once payments have cleared. In order to access this earnings balance so you can withdraw it to your banking institution, you will first need to set up Stripe for your account. Follow the instructions to create a new Stripe account or link an existing Stripe account to your EngineEars account.
- How do I cashout my earnings from digital sales of my direct-to-fan release?
- If you have already completed your Stripe set up for your account, and received an earnings balance (net of commission fees, if any) on your dashboard that you'd like to withdraw to your banking institution, you can follow these steps to cash out your earnings from your release sales.
- How do I find a recording studio to record my next project?
- On EngineEars, you can use search to explore verified recording studios in your area, and book a recording session to record your next music project.
- How do I hire a mixing engineer or mastering engineer to enhance my record for my next release?
- On EngineEars, you can use search to explore verified audio engineers, and book a mixing or mastering service to elevate your sound for your next release.
- On EngineEars, you can use search to explore verified audio engineers, and book a mixing or mastering service to elevate your sound for your next release.