Once your studio profile is activated, you'll need to complete your studio profile in order to start booking sessions!
Outlined below are the steps to set up and configure:
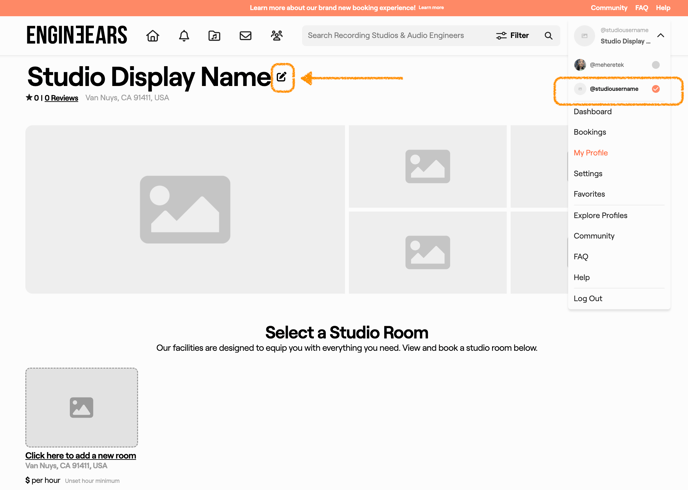
1. Navigate to Your Studio Profile
Click the edit icon next to your studio Display name

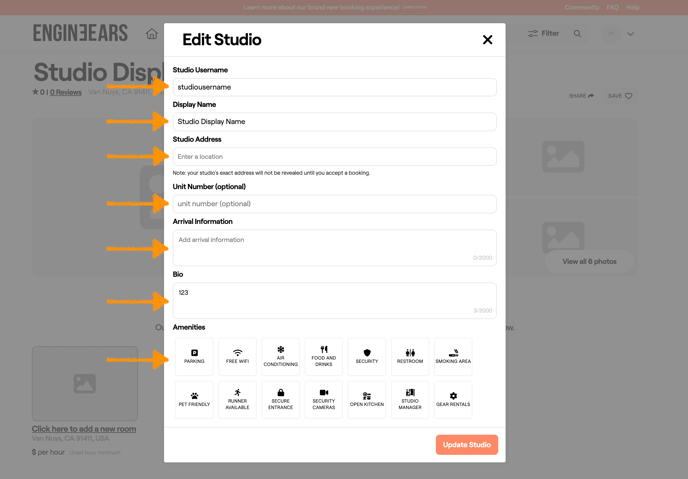
2. Edit Your Studio Parameters
from here you can edit
- Studio Username
- Studio Display Name
- Studio Address
- Unit Number (optional)
- Studio Arrival Information
- Studio Bio
- Amenities
- Upload Primary Photo
- Add Social Media
- Allow Studio Bookings without an audio engineer
- Allow Your Affiliated Engineers to generate Studio Booking Links
- Recording Engineers are included in the room price for all sessions
- Manage Studio Payouts (stripe)
- Manage Google Calendar Access


3. Add Additional Photos
Now that you've added your primary photo, you'll need to add 4 more photos of your studio (at least 5 studio facility photos in total) in order to be eligible for verification.
- Select one of the images on your studio profile to begin the process of adding additional studio photos.

- Select the "Add Photo" button located at the top of the screen. A pop-up will appear, prompting you to browse for an image to upload. Please note that you will need to upload each photo one at a time.

3. Add a Studio Room
- To proceed, you need to add your first studio room by selecting the option labeled "click here to add a new room."

- Enter the name of your studio room and click "create room".

- Update Your Room Details including :
- Room Name
- About This Room
- Maximum # of Session Attendees
- Equipment Lists (hardware, software, plugins, monitors, or microphones)
- Add each item individually. Artists are able to search for specific equipment, so adding all of studio's gear in each room increases your visibility in search results!
- Primary Studio Room Photos (at least 5 photos per room to be eligible for verification)
- Studio Room Amenities
- Delete Room or Update Studio
To modify your Room Details, either select the newly created room from the homepage or click the edit icon located next to the room's display name..

Notes:
- The Equipment List on your Studio profile is specific only to your facility's room(s) and services offered.
- If you are also an Engineer or have Affiliated Engineers who work out of your studio as part of your studio team, make sure to add personal gear/equipment to your/their Engineer profiles (not the Studio profile).

TIP: Want specific guidance for your Studio situation? Check out these onboarding guides to set up your Studio so you can start hosting session bookings in your room(s)!
- Single Room Studio onboarding guide (1 room)
- Multiple Rooms Studio onboarding guide (2 or more rooms)
4. Setup Booking Parameters
To modify your booking parameters, simply click the edit icon located next to the hourly rate on the studio room calendar.
You will be prompted to fill in booking parameters for the room including :
- Hourly Rate ($)
- How much lead time is required for bookings in this room?
- Minimum & Maximum Session Time
- Discount Options
- Add Block Discounts
- Allow Partial Payments
- Select Your Days of Operation
- Room Hours for each day of the week
- Start Time
- End Time

When you're done, click the "Finish Setup" button to save your changes. Your studio room is now ready to accept session bookings!
Learn more about how to get your studio verified to attract new clientele, and how to generate session bookings for existing clients.
